A Deep Dive into Traditional Ceramic Mosaic Elements Placement Labs
Facts:
- Mosaic art dates back over 4,000 years to Mesopotamia.
- A growing trend is therapeutic art workshops for all ages.
Mastering Precision in Ceramic Mosaic Artistry
Welcome to the intricate world of traditional ceramic mosaic elements placement labs. These specialized workshops are more than just art classes; they are hubs of creativity where precision, patience, and artistic vision converge. Whether you are a beginner looking to join traditional mosaic ceramic tile cutting classes or an experienced artist refining your technique, these labs offer a comprehensive environment for learning. This guide delves into the core principles taught in these labs, from the initial cut to the final grout, providing a roadmap for mastering this timeless craft. We will explore everything from the informative guide to manual tactile material clipping to the more technical aspects of the art form.
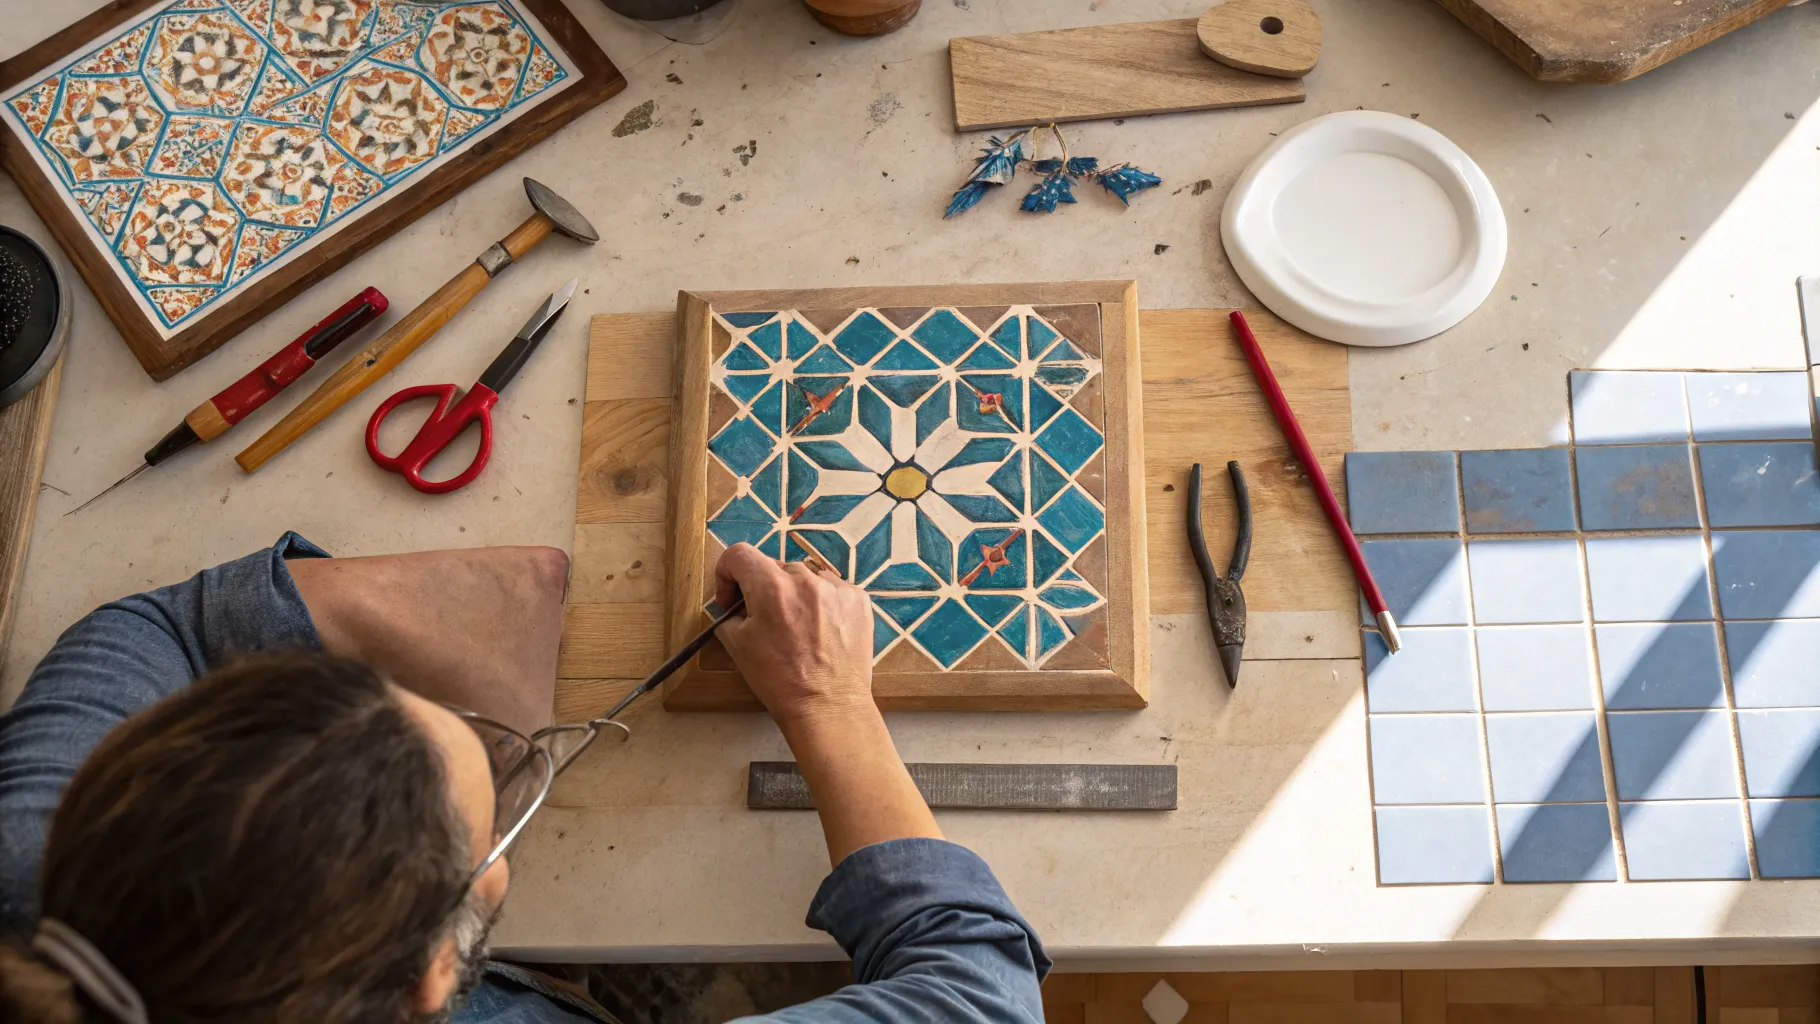
The Foundation: A Guide to Manual Tactile Material Clipping
The journey of any mosaic begins with the tile itself. An informative guide to manual tactile material clipping is the cornerstone of any quality workshop. Unlike using pre-cut tiles, manual clipping allows for unparalleled customization and a truly organic feel to the finished piece. In traditional mosaic ceramic tile cutting classes, students learn to use specialized tools like tile nippers and wheeled glass cutters. The focus is on technique: how to apply the right amount of pressure, how to predict the break line, and how to create specific shapes (tesserae) needed for the design. This hands-on process is not just about breaking tiles; it's about shaping them with intent, a skill that is both meditative and essential for intricate patterns. Mastering this skill is fundamental before moving on to complex placements or worrying about adhesive properties.
Designing with Intent: Geometric Design Element Placement Labs for Seniors
Once the tesserae are prepared, the next phase is placement. This is where artistic vision truly comes to life. The principles of element placement are especially beneficial in geometric design element placement labs seniors often attend, as they combine cognitive engagement with creative expression. These labs focus on andamento (the visual flow and direction of the tesserae) and opus (the pattern in which the tesserae are laid). Participants learn to create harmony, contrast, and rhythm within their designs. For geometric patterns, precision is paramount. Every piece must fit perfectly to maintain the integrity of the design. These labs provide the structured environment needed to practice these meticulous techniques, fostering both skill and a sense of accomplishment, which is incredibly rewarding for artists of all ages, including seniors who find great value in these detailed activities.
The Science of Adhesion: Understanding Adhesive Compound Cure Timelines
Securing the tesserae to the substrate is a critical chemical process that can make or break a mosaic. A deep dive into understanding adhesive compound cure timelines is a non-negotiable part of the curriculum. Different adhesives, such as thin-set mortar, mastic, or epoxy, have varying properties. The 'open time' refers to how long you have to place tiles before the adhesive starts to set, while the 'cure time' is the total time needed for it to reach full strength. Factors like ambient temperature, humidity, and the porosity of both the tile and the substrate can dramatically affect these timelines. Rushing this stage or using the wrong adhesive can lead to tiles shifting or even falling off later. Therefore, a significant portion of lab time is dedicated to material science, ensuring every artist understands the properties of the compounds they are working with for long-lasting, durable results.
Finishing with Finesse: Architectural Mosaic Grout Application Metrics
The final, transformative step in creating a mosaic is grouting. This process not only fills the gaps between the tesserae but also unifies the piece and adds structural integrity. Mastering architectural mosaic grout application metrics is essential for a professional finish. This involves more than just smearing grout over the surface. Key metrics include the correct grout-to-water ratio for a perfect consistency (often described as being like peanut butter), the angle of the grout float to ensure all gaps (interstices) are filled without leaving air pockets, and the precise timing for the initial cleanup to avoid haze. In advanced workshops, students explore different types of grout—sanded, unsanded, epoxy—and learn which to use based on the width of the gaps and the location of the final piece (e.g., indoors vs. outdoors). This meticulous attention to detail during the grouting phase is what separates amateur work from architectural-grade mosaic art.
Actionable Advice for Your First Mosaic Project
Embarking on your first mosaic project can be exciting. To ensure a successful and enjoyable experience, follow these practical steps that encapsulate the core teachings of a placement lab. This advice is derived from the best practices taught in traditional mosaic ceramic tile cutting classes and other specialized workshops.
- Start with a Simple Design: Don't attempt a complex mural for your first project. Choose a simple geometric pattern or a small, stylized image. This allows you to focus on mastering the fundamental skills of cutting and placement without feeling overwhelmed.
- Invest in Quality Tools: A good pair of wheeled tile nippers and a comfortable pair of safety glasses are essential. Quality tools make the process of manual clipping easier and safer, which is a key lesson from any informative guide to manual tactile material clipping.
- Prepare Your Workspace: Cover your work surface to protect it from adhesive and grout. Have all your materials—tiles, substrate, adhesive, and tools—organized and within reach before you begin. A clean workspace minimizes frustration.
- Respect the Adhesive: Pay close attention to the instructions for your chosen adhesive. Mix only what you can use within the recommended 'open time' and be patient while understanding adhesive compound cure timelines before you even think about grouting.
- Practice Grouting on a Test Piece: Before applying grout to your main project, practice on a small test board with a few spare tiles. This will help you get a feel for the consistency and timing, which is vital for understanding architectural mosaic grout application metrics.
Frequently Asked Questions
What is the most important skill to learn in traditional mosaic ceramic tile cutting classes?
The most crucial skill is learning to control the tile nippers to create precise shapes consistently. This requires practice to understand the pressure and angle needed for different types of ceramic, forming the basis of the entire craft discussed in any informative guide to manual tactile material clipping.
Are geometric design element placement labs seniors-friendly?
Absolutely. These labs are highly beneficial as they promote fine motor skills, cognitive function, and social interaction. The methodical and focused nature of creating geometric design element placement labs seniors find very engaging and therapeutic, often with instructors adapting techniques for various dexterity levels.
How long does it take to understand adhesive compound cure timelines?
Basic understanding adhesive compound cure timelines can be learned in a single session by reading the product's technical data sheet. However, truly mastering how environmental factors like humidity and temperature affect these times comes with hands-on experience over several projects.
References
- The History of Mosaic Art - Institute of Classical Art
- Ceramic Arts Handbook - Materials and Techniques
- Journal of Applied Gerontology - Art Therapy and Seniors
- Construction Materials Digest - Adhesives and Grouts Edition
Authored by FreshLifeWire team